
Boilers, the backbone of home heating systems, are susceptible to a range of issues that can impair their efficiency and functionality. From the frustration of no heat or hot water to the perplexity of strange noises and leaks, each problem demands a specific solution to ensure the system’s longevity and safety. For instance, addressing low boiler pressure might simply involve repressurizing the system, whereas resolving kettling noises typically requires the descaling of the heat exchanger. While some fixes are straightforward, others might necessitate a deeper examination of the boiler’s components. Unpacking these common boiler problems not only helps in maintaining optimal performance but also underscores the importance of routine maintenance—a critical aspect often overlooked until a malfunction occurs.
No Heat or Hot Water
A common challenge homeowners face is the absence of heat or hot water, which can be attributed to various issues within a boiler system. To address this, implementing strategic boiler maintenance tips and deploying effective troubleshooting techniques is essential.
Firstly, verify the thermostat settings, ensuring they are high enough to trigger heating. It is not uncommon for settings to be inadvertently adjusted. If the thermostat is in order, inspect the boiler pressure. A significant pressure drop can prevent the boiler from operating efficiently. Re-pressurizing the system, typically by adjusting the filling loop, can resolve this issue.
Further, assess the functionality of the boiler’s pilot light. A pilot light that won’t stay lit may indicate a faulty thermocouple that needs replacing—an integral component that affects the boiler’s ability to heat water.
Additionally, examine the diaphragm and airlock. Faults here can also lead to heating failures and might require component replacement.
For a more systematic approach, checking the timer or programmer for operational integrity is crucial, as malfunctions here can disrupt service schedules, leading to periods without heating or hot water.
Advanced diagnostics should involve examining the heat exchanger for limescale or debris, which can impede boiler efficiency and necessitate professional cleaning or part replacement.
Leaking and Dripping
One of the most frequent complications in boiler systems is leaking or dripping, a problem that often stems from a variety of mechanical issues. Identifying the source of the leak is crucial to preventing extensive water damage and mitigating potential repair costs.
| Source of Leak | Recommended Action |
|---|---|
| Pressure Valve | If the leak is from the pressure valve, it may indicate high boiler pressure. Check the pressure gauge; if it is above recommended levels, adjust or replace the valve. |
| Pump Seal | Deterioration of the pump seal can cause leakage. If the seal is worn out, replacing it is necessary to stop the water from escaping. |
| Pipe Connections | Loose or corroded pipe connections are common culprits. Tighten connections or apply sealing tape to ensure a watertight seal. |
| Heat Exchanger | Cracks in the heat exchanger are a more serious issue, resulting in leaks. This typically requires professional assessment and potentially replacing the exchanger. |
Addressing these issues promptly can prevent the progression of leaks, which could lead to significant water damage and elevated repair costs. Regular maintenance and timely repairs are key to sustaining boiler integrity and functionality.
Strange Boiler Noises
Many homeowners report strange noises emanating from their boilers, which can range from slight humming to loud banging sounds. These noises, often indicators of underlying issues, require immediate attention to prevent more severe damage.
Understanding and addressing the root causes is crucial in effective boiler maintenance and noise reduction.
A common cause of humming sounds is a loose component within the boiler system, such as the central heating pump. Ensuring that all parts are securely fastened is a primary step.
For banging or knocking sounds, one should consider the phenomenon known as kettling, which occurs when limescale accumulates and restricts water flow. This can cause water to overheat and steam, producing noise. Flushing the system to remove limescale is a recommended solution.
Another potential issue is trapped air in the heating system, which can create a variety of noises, including gurgling. Bleeding your radiators can release this trapped air, thereby restoring normal operation and reducing noise.
For optimal resolution, regular servicing by a professional is advised. They can provide a thorough inspection and perform necessary adjustments, such as checking for proper water flow and ensuring the pressure settings are correct, thus enhancing overall boiler efficiency and reducing the likelihood of noise issues.
Low Boiler Pressure
While addressing strange boiler noises often leads to examining internal components, equally important is monitoring boiler pressure, which, if found to be low, can impact the system’s efficiency and functionality.
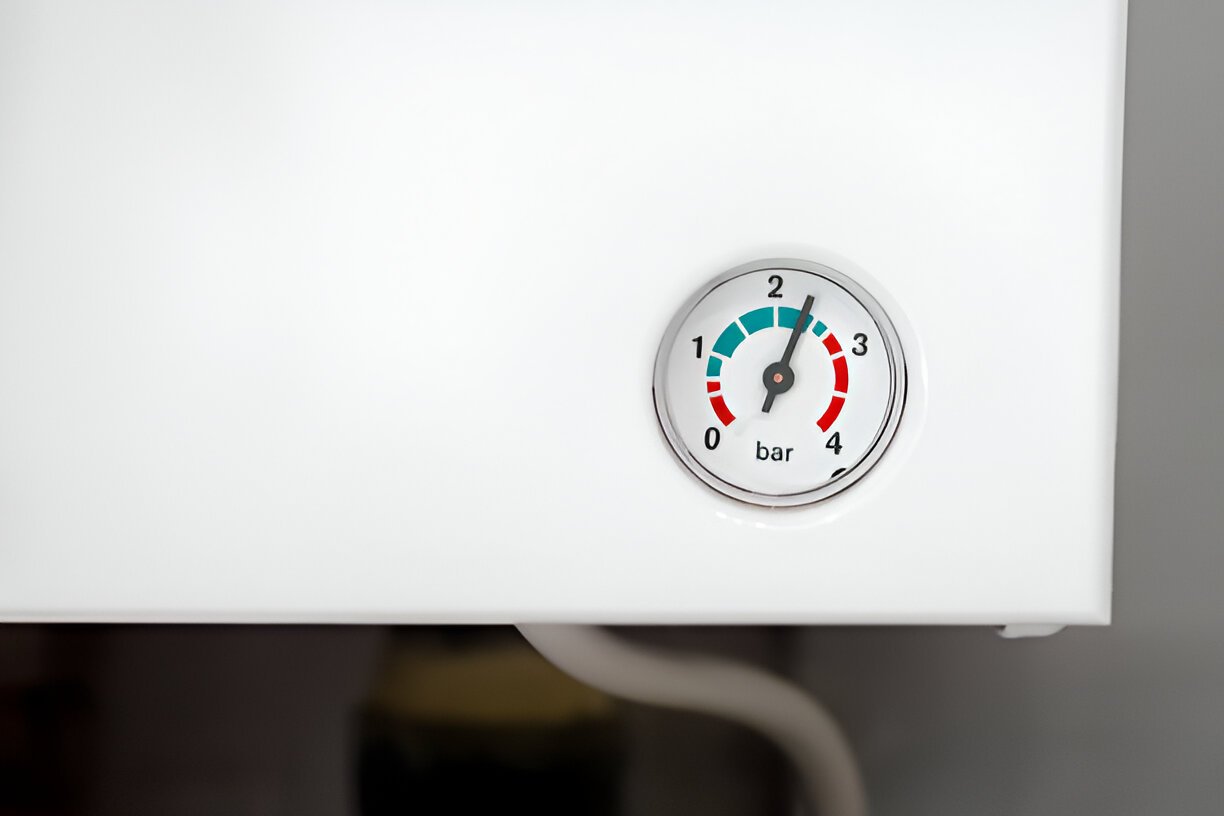
The pressure gauge, a critical diagnostic tool, should ideally register between 1-1.5 bar when the boiler is in a calm state. A reading below this range suggests a pressure deficit, potentially due to leaks or a failing pressure relief valve.
To rectify low pressure, first, ensure there are no leaks in the system. Inspect all visible pipes and radiators for signs of water. If no leaks are found, the issue may lie with the pressure relief valve, which is designed to maintain and regulate pressure within the boiler.
Should this valve malfunction, it could release too much water, consequently lowering the pressure.
The solution involves repressurizing the system manually. This is typically done by opening the filling loop to allow more water into the system until the pressure gauge indicates optimal levels.
However, if repressurization frequently becomes necessary or the pressure continues to drop rapidly after adjustment, it’s advisable to consult a professional to investigate a potential pressure relief valve failure or hidden leaks.
Frozen Condensate Pipe
In colder climates, a common issue faced by boiler systems is the freezing of the condensate pipe, which can lead to system malfunctions or shutdowns.
The condensate pipe carries acidic water, a byproduct of combustion, away from the boiler to a drain outside. When the temperature drops, this pipe can freeze, causing blockages that prevent condensate from escaping. This buildup can trigger safety mechanisms in the boiler, causing it to shut down as a protective measure.
To address frozen pipe issues, first identify if the pipe is indeed frozen. Common signs include a gurgling sound or visible ice on the pipe. If freezing is confirmed, apply gentle heat to thaw the pipe. This can be done using a hot water bottle, a heat wrap specifically designed for pipes, or warm, damp cloths applied to the affected area.
Never use open flames, as this can damage the pipe.
Preventative measures include insulating the pipe with foam tubing to shield it from extreme temperatures. Additionally, rerouting the pipe to less exposed areas or increasing the diameter of the pipe to reduce the likelihood of freezing are effective long-term solutions.
Monitoring weather forecasts and pre-emptively applying heat tape can also prevent condensation issues related to freezing.
Radiator Not Heating
If you notice that your radiator is not heating, it may be due to a variety of underlying issues that can impede the flow of heat throughout your home. Identifying the root cause is essential for restoring functionality efficiently.
Common issues range from air entrapment to malfunctioning radiator valves, each requiring specific interventions.
One of the first steps in troubleshooting is bleeding the radiator, which involves releasing trapped air that can prevent hot water from filling the radiator. This simple yet crucial process enhances heat distribution and efficiency.
Here are key factors to consider and actions to take:
- Radiator Bleeding: Regularly bleed your radiators to remove air pockets that hinder heating performance.
- Check Radiator Valves: Ensure that both thermostatic and manual radiator valves are open and functioning properly.
- Inspect for Blockages: Sludge or debris in the system can restrict water flow. Consider flushing the radiator if performance issues persist.
- Evaluate Circulation: Poor circulation might indicate a pump failure or an improperly balanced system.
- Thermostat Settings: Verify that your thermostat is set correctly and is communicating effectively with the boiler system.
Addressing these elements systematically can restore your radiator’s heating capacity and enhance your home’s thermal comfort.
Boiler Keeps Shutting Off
Continuing with common boiler issues, another frequent problem homeowners encounter is the boiler unexpectedly shutting off. This can be primarily attributed to a range of issues impacting boiler safety and energy efficiency.
One critical cause is low water pressure, which can prevent the boiler from operating securely and efficiently. Homeowners should check the pressure gauge; a reading below 1 bar indicates that the system needs repressurizing, a process that involves adjusting the filling loop to admit more water.
Another significant factor is the overheating of the boiler due to limescale or sludge build-up in the heat exchanger. This not only compromises the boiler’s efficiency but also triggers its safety mechanisms to shut down to prevent further damage. Flushing the system can remove these deposits, restoring functionality and efficiency.
Additionally, a malfunctioning pump could lead to shutdowns if it fails to circulate water through the system effectively. Replacing or repairing the pump can resolve this issue, ensuring consistent operation and optimal energy use.
Regular maintenance and timely intervention are crucial to prevent these problems from recurring, ensuring the longevity and efficient performance of your boiler system.
Thermostat Issues
Often overlooked, thermostat issues are a prevalent cause of boiler malfunctions that can lead to inconsistent heating and increased energy consumption. A faulty thermostat may not accurately gauge indoor temperatures, prompting the boiler to turn off prematurely or overwork, thus impacting both comfort and utility bills.
Thermostat problems can often be rectified through precise calibration or replacement. Here are the key steps and considerations in addressing thermostat issues:
- Thermostat Calibration: Ensure that the thermostat is properly calibrated to reflect actual ambient temperatures. Inaccuracies in reading can cause the boiler to cycle incorrectly.
- Check Location: The thermostat should not be placed near heat sources or in direct sunlight, as this can affect its readings.
- Upgrade Thermostat: Consider upgrading to a smart thermostat for better energy management and accurate temperature control.
- Wiring Inspection: Faulty wiring can disrupt thermostat function. Verify that all connections are secure and free of damage.
- Professional Assessment: If unsure, consult a heating professional to evaluate the thermostat’s condition and decide whether a calibration tweak or a complete thermostat replacement is necessary.
Kettling Problems
To address kettling, the first step is identifying the kettling causes, which typically involve hard water conditions contributing to scale accumulation.
Effective kettling solutions include treating the water with a softener to minimize scale buildup. Additionally, flushing the system to remove existing deposits can restore normal operation. It’s advisable to install a scale reducer or a magnetic filter that captures any circulating debris before it can settle.
For a permanent fix, consider consulting a professional who can assess and possibly replace the heat exchanger if it is extensively damaged.
Regular maintenance and checks can prevent the recurrence of kettling, ensuring the boiler operates efficiently and safely. Homeowners are encouraged to schedule annual servicing to keep their systems in optimal condition, mitigating the risks associated with kettling.
Pilot Light Goes Out
When a boiler’s pilot light repeatedly goes out, it could indicate a problem with the thermocouple, which is responsible for detecting whether the pilot light is lit and consequently allowing gas flow. This issue, while common, demands precise pilot light troubleshooting and careful pilot light maintenance to ensure both safety and functionality.
The thermocouple may lose its ability to function effectively due to a buildup of dirt or a misalignment. In such cases, the gas supply is automatically cut off as a safety measure, causing the pilot light to extinguish.
Here are the essential steps in addressing this issue:
- Inspect the Thermocouple: Check for any visible signs of wear or damage. If it appears to be faulty, replacement may be necessary.
- Clean the Pilot Light Orifice: Remove any debris or buildup that might be clogging the pilot light orifice, affecting the flame quality.
- Check for Drafts: Ensure no drafts are blowing the pilot light out. Adjust the boiler’s positioning or the environment to mitigate this problem.
- Test Gas Pressure. Low gas pressure can also cause pilot light failures. A professional can assess and adjust the pressure accordingly.
- Regular Maintenance: Schedule annual inspections and maintenance to preemptively tackle issues that could extinguish the pilot light.
Implementing these targeted strategies will enhance boiler reliability and operational longevity.
Boiler Not Responding to Thermostat
A common issue that may arise with home heating systems is a boiler’s failure to respond to thermostat commands. This problem can stem from several technical causes, notably thermostat calibration or wiring issues. It’s essential to tackle these with precision to restore optimal functionality.
First, verify the thermostat calibration. Incorrect calibration can lead to miscommunication between the device and the boiler. Use a reliable thermometer to compare the thermostat’s temperature reading with the actual room temperature. If discrepancies exist, consult the thermostat’s manual to recalibrate it or consider replacing it if it consistently fails to measure accurately.
Next, inspect the wiring connections between the thermostat and the boiler. Loose or corroded wires can interrupt the signal, preventing the boiler from activating in response to the thermostat’s commands. Ensure all connections are secure and free from corrosion.
For complex systems or if you’re unsure of the wiring schematic, hiring a professional electrician or a heating engineer is advisable. They can provide a thorough inspection and perform necessary repairs with precision.
Addressing these aspects meticulously not only resolves the immediate issue but also enhances the longevity and efficiency of the heating system. Always prioritize safety by turning off the power supply before attempting any repairs.
Water Isn’t Hot Enough
If your boiler’s water output isn’t reaching the desired temperature, several factors could be at play, requiring a methodical approach to diagnose and resolve the issue. Insufficient heating and temperature fluctuations can stem from multiple sources, each of which must be assessed systematically to restore optimal function.
First, consider the set temperature on your boiler’s thermostat. Improper settings are a common culprit. If the thermostat is accurately set, the issue may lie elsewhere. Below are key areas to evaluate:
- Thermostat Functionality: Confirm that the thermostat is operational and correctly calibrated.
- Boiler Power Supply: Check for any issues with the electrical supply or settings that might be affecting performance.
- Heat Exchanger Condition: A clogged or faulty heat exchanger can reduce heating efficiency.
- Circulation Pump Performance: Ensure the pump is functioning correctly to facilitate adequate water flow.
- System Sludge: Accumulation of sludge in the pipes can obstruct the flow and heat transfer.
Addressing these aspects involves both inspection and potential replacement of parts. For instance, descaling the heat exchanger or replacing a malfunctioning pump could resolve the problem.
Engage a certified technician to handle complex components and ensure your system operates at its peak.
Frequent Loss of Pressure
Frequent loss of pressure in a boiler system can significantly disrupt its efficiency and heating capability, posing a persistent challenge for homeowners. This problem often stems from issues such as leaks in the heating system, faulty pressure relief valves, or problems with the expansion vessel.
To diagnose and address this, one must first inspect the pressure gauge while the system is cold. An optimal reading should generally be between 1 and 1.5 bar. If the gauge indicates a pressure lower than 1 bar, it suggests a need to repressurize the system.
Repressurizing involves adjusting the filling loop to allow water back into the system until the desired pressure is reached on the gauge. One must be cautious not to overpressurize, as this can trigger the pressure relief valve to discharge excess water, leading to further pressure issues.
If repressurizing does not resolve the issue, inspect the system for any signs of leaks or check the pressure relief valve for faults. It’s also crucial to assess the expansion vessel, as a malfunction here can lead to pressure problems.
In cases where these interventions do not rectify the pressure instability, consulting a professional is advisable to ensure comprehensive diagnostics and repair.
Our Pricing
| Our Gas Safety Certificate Prices |
|---|
| Gas Safety Certificate 1 Appliance £45 |
| Gas Safety Certificate 2 Appliance £55 |
| Gas Safety Certificate 3 Appliance £65 |
| Gas Safety Certificate & Boiler Service £74.99 |
Check Out Our Other Services
About the Author: LandlordCertificate
Related Posts

Get Social
Recent Posts
- Gas Appliance Inspection: Ensuring Safety and Efficiency in Your Home
- Rental Property EICR: Ensuring Electrical Safety for Tenants
- Effective Asbestos Risk Management Strategies for Buildings
- Certified Fire Door Inspection: Keeping Maximum Safety and Following Rules
- Commercial EPC Requirements: Compliance and Efficiency